Send Ghost newsletter emails with Brevo - a free alternative to the native Mailgun integration
How to build a simple relay app with Node.js that uses Ghost webhook technology (with Ghost Custom Integrations Tool) to send your Ghost newsletter with Brevo - a free alternative to the native Mailgun integration


Ghost is an awesome blog platform. However, if you chose to self-host your platform (instead of using Ghost Pro for 9$/months) Ghost has only one native integration for sending newsletter Email: Mailgun. While they used to offer a free tier with 600 emails/month they now offer only paid plans starting at 35$ 😭.
In this article I share how a build a simple relay app with Node.js that uses Ghost webhook technology (with Ghost Custom Integrations Tool) to send my newsletter with Brevo (formerly Sendinblue).
Setup your Brevo account and get your API key to create campaigns and send newsletter emails
Account configuration
After signing up to Brevo (using the free plan), first configure your domain and sender profile by completing the following steps:
- Verify your domain: https://help.brevo.com/hc/en-us/articles/115000185270-Verify-your-domain-to-approve-new-senders-automatically
- Authenticate your domain to improve the deliverability of your email (DKIM): https://help.brevo.com/hc/en-us/articles/208848209
- Add a new sender: https://help.brevo.com/hc/en-us/articles/208836149
Generate a dedicated API key
Once you've configured your account, generate your API Key to interact with Brevo programatically.
Create a simple Express server app with Node.js to handle webhooks from your Ghost blog
Initial setup
Create a new Node.js skeleton and install the packages that we will need for this small server.
mkdir ghost-relay
cd ghost-relay

npm init -y

npm install express nodemon dotenv ejs sib-api-v3-sdk @tryghost/content-api
Note: ejs is a templating engine that we will use to create the email templates, sib-api-v3-sdk is the client package to interact with the Brevo API and @tryghost/content-api is a client package to interact with your Ghost content API.
Define your api endpoint for the Ghost webhook and start your app server
Next we need to create an endpoint that will receive information from the webhook (that we will setup later):
const express = require("express");
const path = require("path");

const { generateEmail } = require("../email");
const { createEmailCampaign } = require("../services/emailService");
const { getPost } = require("../services/ghostService");

const app = express();

app.use(express.json());

app.post("/", async (req, res) => {
  try {
    const { id, tags } = req.body.post.current;
    if (tags.some((tag) => tag.name === process.env.NEWSLETTER_TAG)) {
      const { slug, title, html, url, excerpt } = await getPost(id);

      const htmlContent = await generateEmail({
        title,
        html,
        url,
        excerpt,
      });

      const createdCampaign = await createEmailCampaign({
        htmlContent,
        slug,
        title,
      });
      console.log("Campaign created", { createdCampaign });
    }
    res.send("OK");
  } catch (error) {
    console.log(error);
    res.send({ error });
  }
});

module.exports = { app };
After that we can spawn the app server in our index.js file:
require("dotenv").config();
const { app } = require("./api");

const port = process.env.PORT || 3000;

app.listen(port, () => {
  console.log(`Server is running on port ${port}`);
});And adjust our package.json file to be able to launch our app with nodemon:
{
  "name": "ghost-relay",
  "version": "1.0.0",
  "description": "",
  "main": "index.js",
  "scripts": {
    "dev": "nodemon ./src/index.js"
  },
  "keywords": [],
  "author": "",
  "license": "ISC",
  "dependencies": {
  	"@tryghost/content-api": "^1.11.16",
    "dotenv": "^16.3.1",
    "ejs": "^3.1.9",
    "express": "^4.18.2",
    "nodemon": "^3.0.1",
    "sib-api-v3-sdk": "^8.5.0"
  }
}Setup a Ghost client
When the hook will trigger the endpoint, it is supposed to provide almost all information we need about the published post. However, it is best practice not to rely on hook information and fetching the content of the post ourselves based on the postId that will be provided by the hook.
Create an HTML generator for our email
Next step is to implement an HTML rendering engine that will generate our newsletter email. As mentioned before we are relying on ejs to do the job here which will require two things:
- Creating the views (ejs files that will be used as template from the rendering)
- Creating the email generator function that will take the post data and invoke the rendering of the ejs file and get the stringified HTML
<%- include('../partials/header.ejs') %>

  <body
    style="margin: 0 auto; max-width: 720px; font-family: Verdana, Arial; background-color: #F8F8F8; color: #394047;">
    <table border="0" cellpadding="0" cellspacing="0" width="100%" class="wrapper" bgcolor="#FFFFFF">
      <tr>
        <td class="r8-i" style="font-size: 0px; line-height: 0px; padding-bottom: 15px;">
          <a href=<%= BLOG_URL %> target="_blank"
            style="text-decoration: underline; color: #2af09c; padding-top: 1rem; padding-bottom: 1.5rem;">
            <img src=<%= NEWSLETTER_BANNER %>
              width="600" border="0" style="max-width: 100%; height: auto; display: block; width: 100%;"></a>
        </td>
      </tr>
      <tr>
        <td valign="top">
          <table border="0" cellpadding="0" cellspacing="0" width="100%" class="content" style="padding: 1rem 1rem;">
            <tr>
              <td valign="top">
                <p style="color:#7c8082; font-size: 1.2rem;">
                  <strong><%= editionNumber %></strong>
                </p>
                <h1>
                  <%= editionTitle %>
                </h1>
              </td>
            </tr>
            <tr>
              <td valign="top">
                <div><%- html %></div>
              </td>
            </tr>

          </table>
        </td>
      </tr>
      <tr style="background-color: #394047;">
        <td align="center" valign="top">
          <%- include('../partials/footer.ejs') %>
        </td>
      </tr>
    </table>
</body><head>
<meta http-equiv="Content-Type" content="text/html; charset=utf-8" />
<meta http-equiv="X-UA-Compatible" content="IE=edge" />
<meta name="format-detection" content="telephone=no" />
<meta name="viewport" content="width=device-width, initial-scale=1.0" />
<style type="text/css" emogrify="no">
h2 {
padding-top: 2rem;
}
h3 {
padding-top: 1.5rem;
}
p {
line-height: 1.5rem;
}
li {
margin-bottom: 0.5rem;
line-height: 1.5rem;
}
figure {
margin: 0;
}
.kg-bookmark-description {
display: none !important;
display: none;
font-size: 1.4rem;
line-height: 1.5em;
margin-top: 3px;
color: #626d79;
font-weight: 400;
max-height: 44px;
overflow-y: hidden;
-webkit-line-clamp: 2;
-webkit-box-orient: vertical;
}
.kg-bookmark-metadata {
display: none !important;
display: none;
color: #394047;
font-size: 1.4rem;
font-weight: 500;
align-items: center;
margin-top: 22px;
}
.kg-bookmark-icon {
display: none !important;
display: none;
width: 20px;
height: 20px;
margin-right: 6px;
}
.kg-bookmark-thumbnail {
display: none !important;
display: none;
}
img,
input[type="image"] {
max-width: 100%;
height: auto;
}
a {
color: #2af09c;
padding-top: 1rem;
padding-bottom: 1.5rem;
}
.kg-embed-card {
width: 100%;
height: auto;
margin-bottom: 20px;
}
.kg-button-card {
margin-top: 8px;
margin-bottom: 10px;
}
.kg-btn-accent {
color: white !important;
background-color: #2af09c;
padding: 10px;
border-radius: 5px;
}
</style>
</head>
Comment: the CSS in header.ejs is used to transform the HTML from Ghost (with the casper theme) to an email friendly one. Feel free to make the design adjustment you like!
<footer style="padding: 30px 0px;">
    <p>
        <a href=<%= BLOG_URL %> target="_blank"
            style="text-decoration: none;">
            <span style="color: #ffffff;">
                <strong><%= BLOG_TITLE %></strong>
                <p><%= BLOG_BARE_URL %></p>
            </span>
        </a>
    </p>
</footer>const ejs = require("ejs");
const path = require("path");
const { BLOG_URL, BLOG_BARE_URL, BLOG_TITLE, NEWSLETTER_BANNER } =
process.env;
const renderHtml = async ({
editionNumber,
editionTitle,
url,
excerpt,
html,
}) => {
return new Promise((resolve, reject) => {
ejs.renderFile(
path.join(__dirname, "./views/pages/index.ejs"),
{
editionNumber,
editionTitle,
url,
excerpt,
html,
BLOG_URL,
BLOG_BARE_URL,
BLOG_TITLE,
NEWSLETTER_BANNER,
},
(err, data) => {
if (err) {
reject(err);
} else {
resolve(data);
}
}
);
});
};
const generateEmail = async ({ title, html, url, excerpt }) => {
const [editionNumber, editionTitle] = title.split(/\s*-\s*/);
const renderedHtml = await renderHtml({
editionNumber,
editionTitle,
url,
excerpt,
html,
});
return renderedHtml;
};
module.exports = { generateEmail };Send the new email campaign to Brevo
Finally we just have to implement the Brevo service that will create a our mail campaign with our HTML
const SibApiV3Sdk = require("sib-api-v3-sdk");

const defaultClient = SibApiV3Sdk.ApiClient.instance;
const apiKey = defaultClient.authentications["api-key"];

apiKey.apiKey = process.env.BREVO_API_KEY;

const { SENDER_EMAIL, SENDER_NAME, REPLY_TO, EMAIL_LIST_ID, CAMPAIGN_TAG } =
  process.env;

const apiInstance = new SibApiV3Sdk.EmailCampaignsApi();

const createEmailCampaign = async ({ htmlContent, slug, title }) => {
  try {
    const response = await apiInstance.createEmailCampaign({
      sender: { name: SENDER_NAME, email: SENDER_EMAIL },
      tag: CAMPAIGN_TAG,
      name: slug,
      subject: title,
      replyTo: REPLY_TO,
      recipients: {
        listIds: [parseInt(EMAIL_LIST_ID, 10)],
      },
      inlineImageActivation: false,
      htmlContent,
    });
    return response;
  } catch (error) {
    console.log(error);
  }
};

module.exports = { createEmailCampaign };
Set your environment variables and launch the app
Across the code, we rely on several environment variables that you will need to adjust with your own variables.
PORT=3000

BREVO_API_KEY="Your Brevo API key here"
SENDER_NAME="The name you want to be displayed in the email"
SENDER_EMAIL="email address from your domain"
REPLY_TO="Reply to email address"
EMAIL_LIST_ID="The id of your contact email list in Brevo"
CAMPAIGN_TAG="Useful if you create several newsletters"

BLOG_URL="Blog url"
BLOG_BARE_URL="Blog domain name"
BLOG_TITLE="Blog title"

NEWSLETTER_BANNER="Banner for your newsletter"
NEWSLETTER_TAG="To filter the posts you want to send"

GHOST_API_KEY="Your content API key from your Ghost custom integration"Then you can launch your server by running the ```npm run dev``` command.
Enable local tunnelling with ngrok
If you are sunning your app locally, you will need to expose your localhost to the internet. One simple way of doing it is to use a proxy service like ngrok which will create an endpoint available to the internet and securely tunnel incoming requests to your localhost where your app is running.
npm install -g ngrok
ngrok http 3000 // will redirect incoming requests to localhost:3000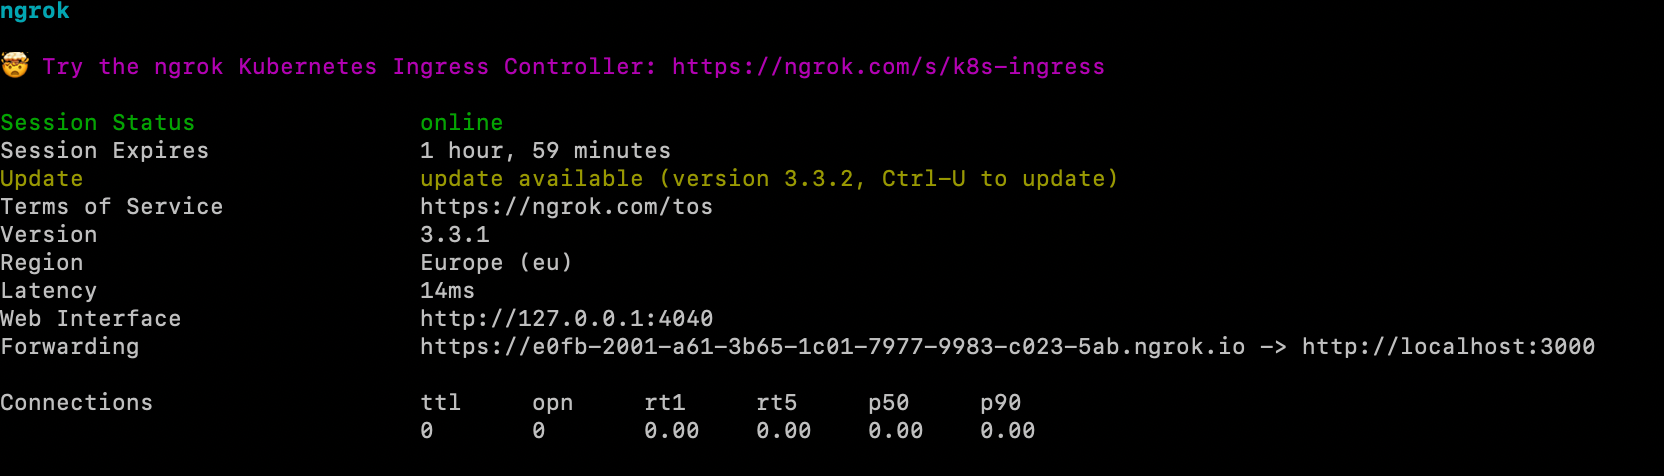
Create a custom integration in Ghost
Once your app is running and your endpoint is exposed, you can now create a custom integration to your blog.

When creating your webhook, be sure that you are using the ngrok endpoint (and refresh it if needed as it has a limited "time to live").
How to easily test your setup
One simple way to test the complete flow is to create a "test webhook" that will be triggered every time you update a post. When it's done, just update one of your posts and see if a campaign is created with the correct data and layout. If yes, then delete the test hook and you are good to go!
Closing remark
In this tutorial, I showed how I created an alternative to the mailgun integration for your self hosted Ghost newsletter. The presented setup does not trigger the sending of the newsletter campaign in Brevo (in order to be able to check the results beforehand).
If you want me to create a follow-up article on how to host the ghost-relay app and to fully automate the process (or add other integration). Just let me know!
Link to the GitHub repository (feel free to fork it or suggest improvements):
 NicoBresson
That's it! Thanks for reading ✌️
Subscribe to The Bootstrapping Dad to receive my bi-weekly newsletter about technology, coding, and bootstrapping directly in your inbox 🥐☕️